This is a long post on something that actually took me about 5mins, but I found a lot to talk about!! Once I've explored a bit more I'll post some more thoughts.
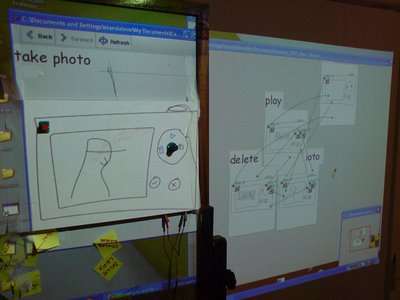
Ok, so this is an idea I've been wanting to try for a while as a possible way of setting up a nicely integrated process for designing information appliances. For the set upI used an interactive whiteboard with DENIM and the pin and play key input simulator running. I also had a bit of the Pin and Play substrate attached to another board (because I wasn't too sure how happy my supervisor would be with me sticking things to a brand new interactive white board!!) which was within the field of the interactive white board's projector.
DENIM (http://dub.washington.edu/denim/)The version of DENIM running has an additional plug in which was comissioned by the PAIPR group (i.e. Steve sorted it!) which allows the simulator to run using key press inputs, rather than relying on mouse clicks. I've used DENIM before when trying to make an interface for user testing and it's a brilliant tool but has it's problems when applied to information appliances. Firstly, once the interface gets too big the application falls over and it won't save. Secondly, if a function (like an off button) can be accesible from anywhere in the interface, arrows have to be drawn from every diagram back to the same place. This is seriously tiresome and clutters things up. The other issues relate to having to put a key press in every time, and the lack of a master slide style background. Anyhow, this isn't really the point of this post so I'll move onto bigger and better things!
PIN AND PLAY KEY INPUTAbsolutely top program and exactly what I needed to use pin and play with the same interfaces as the IE unit. I really liked the way the dials were integrated, particularly being able to control how many segments it's split into. This relates nicely to the way we integrate dials into the IE system as we use segmented pots (i think thats right!). Also, the fact that the key mappings are remembered is particularly nice feature.USING THE SYSTEMOK, so once these things were all running together, it was time to put together a quick interface. I wanted to use the dials to see how that fitted in to it all so a camera seemed to be a good choice. Drawing out the outline was nice and quick on DENIM and then it was a case of arranging things as if I were putting together a set of state transition diagrams. (DENIM works really really well on an interactive whiteboard and feels really nice to use. It also stops people doing things like taking down your post it notes because they want to use the wall for something else when you go for a cup of tea! Plus post it notes tend fall off the wall...) As this was just a quick thing, I only did a very very small interface involving a power button and then a dial to change between album, delete and picture taking modes. Once I'd put together this interface (all of 5minutes, very very fast to do) I then ran the interface (DENIM makes an HTML version of the interface and then runs this in a new window) and dragged the new window across so it was projected onto the pin and play substrate. Once there, I pushed the power button and dial into place. I then set the key presses using the input software. Incedentally, the way this software works with the little black and yellow circle in the corner to activate the program works really nicely on an interactive whiteboard as it's quick to access without having to double click etc. OK, so firstly, we've managed to put an interface together with lightning speed, set up the key presses at a similar pace and have the resulting simulator projected onto the substrate. Time to test things.... (as a quick note Dale, who is a third year student, was helping me out and had some really interesting thoughts on all this)
Firstly, there was a bit of a problem on the DENIM side of things in that I couldn't scale the simulator down so that the camera appeared at a realistic size. I'm not particular fan of testing things when they are the wrong scale as I feel this actually changes things (such as where controls appear in your field of vision etc). However on the plus side, it was easy to see the icons arrayed around the dial. This would be lost if the simulator was scaled down, as the top of the dial is black and also when you get down to that sort of size the resolution of the projector becomes an issue.
Whilst I'm on the subject of the colour of the top of the dial, there was a similar issue with the button. On reflection, using the white button that we have for the power would have been better as it would have been possible to see the power symbol projected onto it.
The integration of the dial was an interesting issue. Being able to integrate it this quickly, and experiment with the dial in a physical manner was quite frankly absolutely astounding. Dials are particularly difficult to try out using just a computer screen and being able to try out the interaction and feel of the control in a physical way in conjunction with a quick sketch was really valuable. As a design tool I would go so far to say that this was invaluable.
Dale mentioned something interesting about control feel when trying out the interface. I'd split the control into three sections in the key input software, but this isn't refelcted in the physical operation of the dial. i.e. on a camera with a dial you would expect it to click into place for each option giving the user tactile feedback. I'm not sure how easy this would be to implement, but maybe having different dials that are split into 3, 4, 5, etc sections (in terms of physical clicks) would be possible? I think it's important to make the point that not all dials need to be segmented, even if they are in the key input software. Sometimes smooth operation is the correct tactile feedback. In this case though it would be more appropriate to have a dial that clicks.
SUMMARYI think this set up has some really exciting potential. The speed of the sketching in DENIM coupled with the speed of Pin and Play made for a very fluid and fast design tool. DENIM does have it's problems and would need some revisions to smooth the workflow for information appliace design. Being able to use things like dials and evaluate how this affects the interaction in a sketchy, rapid way is really useful design activity. And on that note, that is how i see this whole thing. An exciting design activity with maybe some high level user testing to try out mental models. What I would then want to do is make a 3D interactive prototype. From the pin and play and denim set up, i can move on confident that I have explored issues such as dials and sliders and made informed decisions, and that i already have a working interface made. I can then invest the time making an IE unit prototype (although it's quick, it's not as fluid as the pin and play set up) to explore issues such as how things work in a hand held and mobile context (having buttons on the back, using a thumb to enter text, etc, etc). So to summarise, I'd do the exploration with pin and play, and then larger scale mobile testing using a 3D IE prototype.
WHERE I'D LIKE TO TAKE THISWhat I'd really like to do with this is something similar to the 24hour design project run at UWIC a few years ago. i.e. get a load of people together and see how fast these things can be done. I'd like to run it over more than 24 hours as this is actually too short a period of time to involve user testing and feedback. Maybe a week long project or something, or three days, something like that. Anyhow, this is all somewhat speculative and a bit of a pipe dream at the moment, but it's something I've started to give some more thought to recently.
The other thing I think would be good to do is contact the guys working on the DENIM project and maybe see if they would be interested in looking at an information appliance varient of the software.
ANY THOUGHTS? LET ME KNOW!!Cheers,
Alex Woolley


